The physics of water movement in a flat roof assembly
To understand why commercial roof inspections require technology that residential inspections don't, you need to understand how water actually behaves inside a flat roof assembly. This is the foundational knowledge that separates a thorough commercial inspection from an inadequate one.
The layered assembly
A typical commercial flat roof is not a single layer — it's a system of multiple components stacked on top of each other. From the weather surface down:
Why the travel effect makes visual inspection inadequate
A visual inspection after a storm identifies surface conditions: membrane punctures that are large enough to see, visible seam separations, obvious debris impact damage. What it cannot find:
- Moisture that has already entered the insulation and migrated — potentially weeks ago
- Micro-punctures under 1 inch that have not yet allowed enough water accumulation to stain the ceiling
- Seam delamination on the underside of the membrane that is not visible from above
- Fastener pull-through that has created breach points at attachment locations
- Water that has already reached the structural deck but has not yet shown as a stain below
- Insulation saturation that has compromised R-value without any visible surface evidence
A contractor who completes a post-storm visual inspection and reports "no damage found" on a flat roof either doesn't understand flat roof systems or is not using appropriate technology. The absence of visible surface damage is not evidence that the insulation below is dry.
Patching where the stain appears without finding the breach source
Scenario: Hurricane winds create a membrane breach at the northeast corner of a 20,000 sf warehouse roof. Water enters, travels 18 feet southwest through the insulation, and appears as a ceiling stain in a break room. A residential contractor is called, patches the area above the stain, and declares the job done. Six weeks later the stain returns — slightly shifted — as water that was already in the insulation continues migrating. A second patch is applied. The insulation, now saturated across a 300 sf area, is growing mold. The structural deck fasteners are corroding. What began as a $2,000 membrane repair is now a $35,000 insulation replacement and deck remediation — and the original insurance claim window may have closed. This is not an edge case. It is the most common pattern in undercapitalized commercial storm repairs.
Every commercial flat roof inspection technology — how each works and when to use it
Infrared Thermography (IRT)
Infrared thermography is the most widely used and most misunderstood commercial roof inspection technology. It is not magic — it has specific limitations that must be understood to use it correctly, and incorrectly-timed scans produce misleading results that can cause an insurer to underpay a legitimate claim.
How It Works
Water has a significantly higher thermal mass than dry roofing materials — it absorbs heat more slowly during the day and releases it more slowly after sunset. A thermal camera scans the roof surface in the 2–4 hours after sunset on a day that received direct sun exposure. Dry insulation has already cooled; wet insulation is still releasing the day's absorbed heat. These temperature differentials — invisible to the naked eye — appear as distinctly warmer zones in the thermal image. The thermographer maps these zones, and they represent areas of moisture saturation in the insulation below the membrane.
Best for
- Mapping the full extent of moisture in insulation — not just the breach location
- Large roof areas scanned quickly — 20,000 sf in 2–4 hours
- Non-destructive — no membrane cutting or material removal
- Excellent documentation for insurance claims — thermal maps are compelling visual evidence
- Drone-mounted cameras allow faster scanning and safer access on large industrial roofs
Limitations
- Requires specific weather conditions — must be performed 2–4 hours after sunset, on a day with significant sun exposure. Cannot be done day-after a storm if weather remained overcast.
- Shows moisture location, not breach location — the warm zone is where water IS, not where it entered
- Gravel ballasted roofs significantly reduce accuracy — ballast masks temperature differentials
- Standing water on the roof surface produces false positives
- Requires a certified thermographer — not every contractor operates cameras correctly
The industry standard governing commercial roof infrared surveys is ASTM C1153 — Standard Practice for the Location of Wet Insulation in Roofing Systems Using Infrared Imaging. Any report from a reputable commercial inspector should reference compliance with ASTM C1153.
Electronic Leak Detection (ELD)
Electronic leak detection finds the actual membrane breach directly — not the moisture it caused. This is fundamentally different from infrared, which finds water that already exists. ELD is the technology that identifies the hole. It is the most precise of all commercial inspection methods.
How It Works — Two Systems
Low-Voltage (Vector Mapping / EFVM): A perimeter wire loop is placed around the test area and energized with a low-voltage DC charge (typically 30V). The roof surface is wetted. Any breach in the membrane completes a circuit between the surface water and the conductive substrate below. A technician walks the surface with probe sensors, following the electrical field distortion to pinpoint the breach location with centimeter-level accuracy.
High-Voltage (Spark Testing / Holiday Testing): A high-voltage probe sweeps the dry membrane surface. Where the membrane is intact, current cannot arc to the substrate. Where a breach exists — even a pinhole — current arcs visibly and audibly. Used primarily on newly installed membranes for quality control, and on roofs where wetting is impractical.
Best for
- Locating the exact breach point — not just the moisture zone
- Detecting pinhole leaks invisible to visual inspection
- Newly installed membranes — quality control verification before insulation is placed
- Post-storm assessment when thermal conditions are not suitable for infrared
- Confirming repair quality — test immediately after patching to verify watertightness
Limitations
- Requires a conductive substrate — not effective on roofs over non-conductive decks without special setup
- Cannot map moisture extent — only locates breaches in exposed membrane
- Ballast, pavers, or vegetation must be removed before testing
- Penetrations (pipes, HVAC curbs, vents) create interference and require guard cables
Nuclear Moisture Metering
Nuclear moisture meters use low-level nuclear radiation to measure the hydrogen content of roofing materials — and since hydrogen in a roof assembly almost exclusively exists in the form of water molecules, this precisely quantifies moisture content by percentage. It is the most rigorous quantitative method and produces data that is difficult for insurers to dispute.
How It Works
The meter emits a small amount of gamma radiation downward through the roof assembly. Hydrogen atoms (in water) scatter the gamma particles in a distinctive pattern. A detector in the meter measures the scatter rate, which correlates to hydrogen content, which correlates to moisture percentage. The technician takes readings at a grid of test points across the roof — typically every 5 to 10 feet on a post-storm assessment — and produces a quantitative moisture map showing percentage values at each point.
Best for
- Quantitative data — not just "wet" or "dry" but actual moisture percentages
- Legally defensible in insurance disputes — hard numbers are difficult to challenge
- Useful on ballasted roofs where infrared is compromised
- Establishing baseline dry readings for future comparison
- Verifying dryness after remediation before re-roofing over existing insulation
Limitations
- Slow — point-by-point measurement across a large roof takes significantly longer than infrared
- Requires NRC (Nuclear Regulatory Commission) licensed operator and registered equipment
- Higher cost per inspection than infrared or ELD
- Measures downward — depth of moisture is not differentiated
Core Sampling
Core sampling is the definitive confirmatory method — a 3-4 inch diameter plug is cut through all layers of the roof assembly to visually and physically verify conditions found by the non-destructive methods above. It is destructive, leaves a hole that must be patched, and is used selectively — but it provides absolute ground truth that no non-destructive method can match.
How It Works
Using a core drill or hole saw, the technician cuts a cylindrical sample through the membrane, cover board, insulation, and any vapor retarder layers. The core is extracted and visually and physically examined: Is the insulation wet, damp, or dry? Is there discoloration indicating historic moisture? Has the insulation board delaminated? Is there biological growth (mold)? Is the vapor barrier compromised? The hole is patched with a compatible roofing plug. Cores are typically taken at locations identified by infrared or nuclear readings as suspect.
Best for
- Confirming non-destructive findings before filing a large insurance claim
- Determining how many layers of old roofing exist (affects tear-off cost)
- Evaluating insulation R-value degradation from long-term moisture exposure
- Identifying the specific system (membrane type, insulation type, deck type) for repair specification
- Mold assessment — determining whether biological growth has established in the insulation
Limitations
- Destructive — every core leaves a hole that requires patching
- Point samples only — conclusions must be extrapolated from limited locations
- Not practical as a primary survey method on large roofs
Which method to use — and when to combine them
No single method answers every question. A thorough post-storm commercial inspection typically combines methods based on the specific situation.
| Method | What It Finds | Best Post-Storm Timing | Limitations | Cost Range |
|---|---|---|---|---|
| Infrared (IRT) | Moisture extent in insulation | 2–4 hrs post-sunset, clear day required | Cannot locate breach; weather-dependent | $0.03–0.08/sf |
| Electronic Leak Detection (ELD) | Exact breach locations | Immediately — day or night | Requires conductive substrate; no moisture mapping | $0.05–0.12/sf |
| Nuclear Moisture Meter | Quantitative moisture % by grid point | Any time after storm clears | Slow; requires licensed operator | $0.08–0.15/sf |
| Core Sampling | Physical condition of each layer | After non-destructive survey to select core locations | Destructive; point samples only | $150–400/core + patch |
| Visual Inspection | Surface damage only | Immediately | Misses subsurface moisture entirely | Low / included |
The recommended post-storm inspection sequence for commercial flat roofs
Immediate (within 24–48 hours of storm): Visual inspection + emergency mitigation
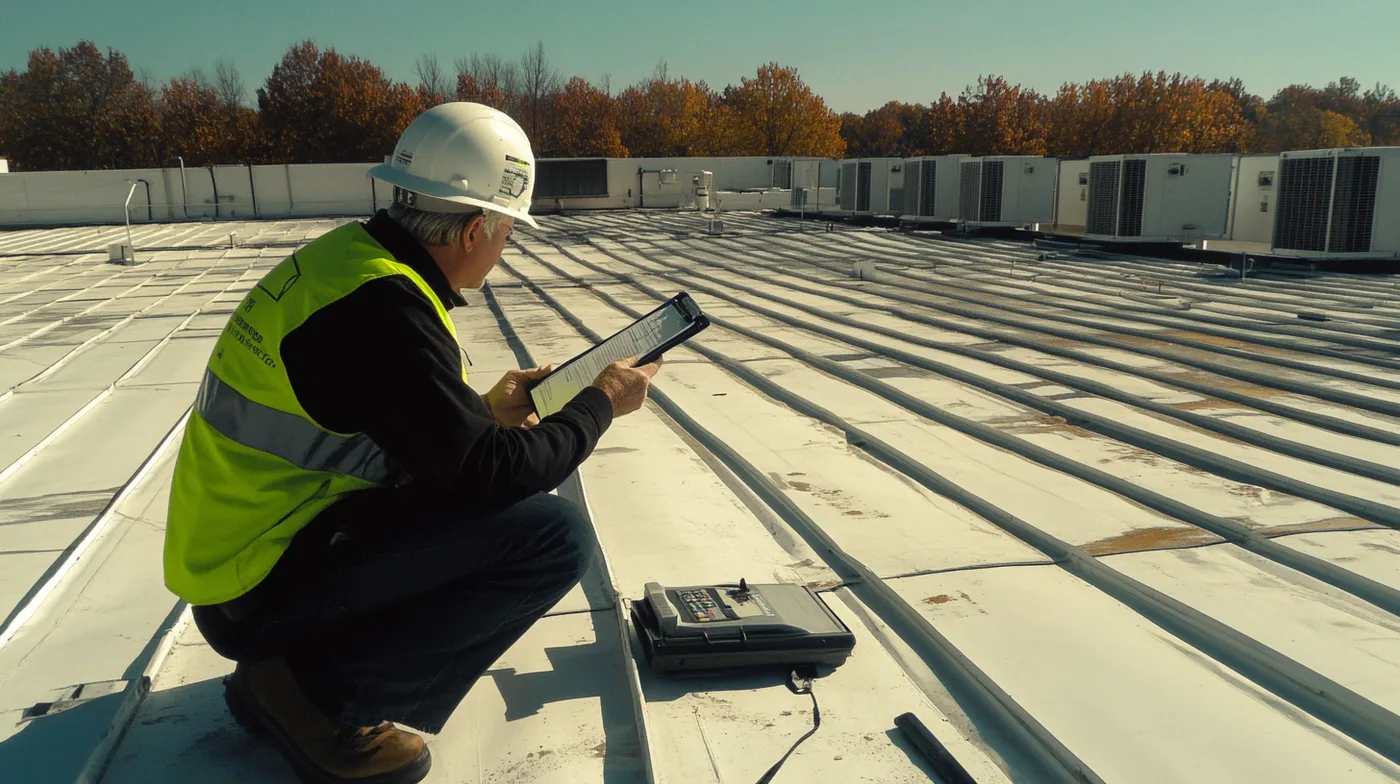
Visual walk of the entire roof surface to identify obvious surface damage — visible membrane punctures, separated seams, displaced flashing, debris impact craters, standing water. Simultaneously apply temporary sealing to any visible breaches. This stops active water entry while non-destructive scanning is scheduled. Document everything photographically with timestamps before any mitigation work begins.
Within 72 hours: Electronic Leak Detection (ELD)
ELD can be performed in any weather conditions and does not require the thermal conditions needed for infrared. Deploy ELD across the entire membrane area to locate all breach points — not just the visible ones. On a storm-damaged roof, ELD will often find 3–5 additional micro-breaches that were not detected visually. Each breach location is marked, documented, and photographed. This is the foundation of the "true scope of loss" for your insurance claim.
Within 3–7 days: Infrared Thermography scan (weather permitting)
Schedule the infrared scan for the first suitable evening — clear sky, direct daytime sun exposure, wind under 15 mph. The thermal scan maps the full extent of moisture in the insulation, which by this point may have migrated significantly beyond the breach locations. The moisture map defines the insulation replacement scope — critical for a complete insurance claim because it quantifies saturated material beyond just what's directly under the breach.
After thermal scan: Core sampling at suspect locations
Take cores at the worst-reading locations from the infrared scan to verify conditions physically. Cores confirm: insulation saturation level, presence of mold or biological growth, deck condition, and layer count. Each core provides physical documentation — a sample that can be presented to the adjuster. Five to ten cores on a 20,000 sf roof produces compelling physical evidence of the damage scope.
Compile comprehensive inspection report for insurance claim
The complete inspection report — combining visual findings, ELD breach locations, infrared thermal maps, nuclear readings if taken, and core sample results — forms the documented basis of the commercial insurance claim. This is the package your adjuster needs to understand the true scope of loss. An adjuster who receives only a visual inspection report on a flat roof claim is not receiving adequate documentation.
What storm damage looks like on each commercial roofing system
Each membrane type has specific failure modes under storm conditions. Knowing what to tell your inspector to look for — and what to insist appears in their report — protects your claim.
TPO (Thermoplastic Polyolefin)
The most common commercial membrane. TPO is heat-welded at seams — seam integrity is the first thing to check after high-wind events. Storm-specific failure modes:
- Hail punctures — typically under 1 inch, often appearing as small dimples or perforations in the membrane field. Almost never visible without close inspection; ELD locates them definitively.
- Seam delamination — heat-welded seams can fail under wind uplift pressures exceeding design parameters. Look for seam separation at field seams, flashing seams, and penetration flashings. Pull-testing seams adjacent to visible failures often reveals additional delamination.
- Edge and corner uplift — wind pressure at corners and edges is 2–3x higher than field areas. Check all perimeter flashings, edge metal terminations, and corner details first.
- HVAC curb flashing — every rooftop HVAC unit has a curb-mounted base with membrane flashing. These are high-failure points in wind events. Check all four sides of every curb for separation.
EPDM (Ethylene Propylene Diene Monomer)
Rubber membrane installed in either adhered, mechanically attached, or ballasted systems. Storm behavior varies significantly by installation method:
- Ballasted EPDM — ballast (river rock or pavers) holds the membrane by weight. In high-wind events, ballast can displace, exposing membrane to uplift. Check for ballast displacement patterns — bald areas indicate wind exposure. Infrared is compromised on ballasted systems; nuclear metering is preferred.
- Adhered EPDM — adhesive failures appear as blisters or tent-like separations. These create an air pocket under the membrane that acts as an uplift sail in future wind events. Probe suspect areas gently — a blister will feel soft and springy rather than solid.
- Seam lap adhesive — EPDM uses tape or adhesive seams rather than heat welding. Storm exposure can degrade adhesive at laps, especially if the seam was aging before the storm. Check all lap seams for peeling edges.
- Shrinkage stress — EPDM shrinks over time, putting tension on all terminations and flashings. Storm wind adds dynamic uplift to already-stressed terminations. Perimeter terminations where the membrane is clamped or nailed into the wall are common failure points after major wind events.
Modified Bitumen (Mod Bit) and Built-Up Roofing (BUR)
- Granule loss — hail knocks granules off the cap sheet, exposing the asphalt below to UV degradation. Unlike residential shingles where this is immediately visible, the granule loss on a commercial cap sheet is best quantified by a sweep of the drains and gutters — heavy granule accumulation after a storm indicates significant cap sheet impact.
- Blister formation — steam blisters can develop after moisture trapped in the assembly is heated by post-storm sun. A blister that pops exposes the substrate. Walk the roof surface carefully in the days after a storm, as new blisters may continue forming.
- Lap and mopped seam separation — BUR systems use mopped asphalt to bond layers. In extreme heat during recovery period after a storm, asphalt can flow, and seams under stress can separate. Cold-weather storms can make asphalt brittle and cause crack failures at all joints.
Commercial Metal Roofing
- Hail damage to panels — visible denting on metal panels is the most obvious indicator of hail. But the primary concern is fastener and seam integrity. High-impact hail can loosen exposed fasteners and damage seam sealants even when denting is modest.
- Standing seam separation — standing seam panels interlock at a raised ridge. Wind uplift can cause panel movement that separates these interlocks. Inspect the full length of every seam ridge for separation or cracking.
- HVAC unit and penetration seals — HVAC unit bases, pipe penetrations, and skylight curbs all use sealant to maintain watertightness on metal roofs. These sealants age and can fail under storm dynamic loading. Check every sealant joint after any high-wind event.
- Thermal movement fatigue — metal roofs expand and contract significantly with temperature. Storm-accelerated thermal cycling (especially the rapid cooling following a hurricane) can fatigue fastener connections and accelerate existing fatigue cracks.
What a complete commercial post-storm inspection report must contain
The inspection report is the primary documentation your adjuster uses to evaluate your commercial claim. An inadequate report — one that only documents surface damage — gives the adjuster grounds to argue the insulation is dry and the scope is limited to membrane repair. A complete report forecloses those arguments. Here is every element your report should contain:
Section 1 — Property and System Identification
- Property address, building name, and square footage of roof area inspected
- Date and time of inspection — critical for establishing timeline relative to storm event
- Inspector name, company, and relevant certifications (infrared thermographer certification, ELD certification, NRC license if applicable)
- Roofing system identification: membrane type and manufacturer, insulation type and thickness, deck type, approximate age of system
- Weather conditions at time of inspection and at time of storm event (with NOAA weather data reference)
- Equipment used: infrared camera model, ELD equipment model and voltage, nuclear meter model and registration
Section 2 — Storm Event Documentation
- Date and time of storm event
- NOAA or National Weather Service weather data for the specific location — wind speed, hail size, rainfall rate
- FEMA disaster declaration number if applicable
- Photos of any visible exterior damage consistent with storm event (damaged neighboring properties, trees, street signs)
- Statement by inspector that damage pattern is consistent with the documented storm event and not consistent with pre-existing wear
Section 3 — Visual Inspection Findings
- Aerial or plan-view diagram of the roof with damage locations marked
- Photographs of all visible membrane damage — each annotated with location reference
- Description and photographs of all flashing and edge metal conditions
- Condition of all penetrations: HVAC curbs, pipe penetrations, skylights, drains
- Granule accumulation in drains/gutters (for cap sheet and modified bitumen systems)
- Evidence of prior repairs that should not be attributed to current storm
Section 4 — Non-Destructive Testing Results
- Infrared thermal scan: thermal images with moisture zone locations marked on a roof plan, ASTM C1153 compliance statement, ambient and surface temperature readings at time of scan, total wet area in square feet
- Electronic Leak Detection: each breach location precisely identified and mapped on roof plan, voltage used, conductive substrate type, verification of patched areas post-repair
- Nuclear moisture readings: grid-point data table showing moisture percentages at each test location, baseline dry reading for comparison, total area exceeding acceptable moisture threshold
- Estimated extent of insulation saturation versus visual inspection finding alone
Section 5 — Core Sample Results
- Location of each core on the roof plan
- Photographs of each extracted core showing all visible layers
- Description of moisture condition in each insulation layer
- Presence or absence of mold, biological growth, or substrate deterioration
- Verification of system layer count (relevant for tear-off scope and building code requirements)
Section 6 — Scope of Loss Conclusion
- Clear statement of total membrane area requiring repair or replacement, in square feet
- Total insulation area requiring replacement, in square feet — often significantly larger than membrane repair area due to lateral migration
- Any structural deck areas requiring remediation
- All penetration flashings requiring replacement
- Mold remediation scope if applicable
- Statement clearly attributing the loss scope to the documented storm event rather than pre-existing conditions or deferred maintenance
- Estimated replacement cost for contractor reference
Adjusters move faster and pay more on claims with complete technical reports
Commercial adjusters assigned to large roof claims are evaluating risk — both the risk of overpaying a fraudulent claim and the risk of underpaying a legitimate one and facing a bad faith action. A report that provides infrared maps, ELD breach locations, nuclear readings, and core sample photos removes the uncertainty that makes adjusters conservative. There is nothing to dispute. The insulation is wet. The breach was caused by the storm. The scope is defined by objective measurement. Claims with this level of documentation consistently settle faster and closer to the true replacement cost than claims supported only by a visual inspection and a contractor estimate.
10 questions to ask before hiring a commercial roof inspector
Not every roofing contractor who claims to do "commercial inspections" has the equipment, training, or certification to produce a technically defensible post-storm report. These questions separate qualified commercial inspectors from those who do residential work and occasionally walk flat roofs.
- Do you perform infrared thermography scans, and are you certified by ASNT or ITC? (American Society for Nondestructive Testing or Infrared Training Center certification confirms they operate cameras correctly and understand thermographic principles.)
- What electronic leak detection system do you use — low-voltage vector mapping or high-voltage spark testing? (If they don't know the difference, they don't do ELD.)
- Do you have nuclear moisture meter capability? If so, are you NRC registered?
- How many commercial flat roof post-storm inspections have you completed in the last 12 months? (Track record on commercial membranes, not just residential.)
- What roofing systems do you have specific experience with — TPO, EPDM, modified bitumen, BUR, commercial metal?
- Will your report include an ASTM C1153-compliant infrared moisture map?
- Can you provide the inspection report in a format that references specific breach locations on a dimensioned roof plan?
- Have you performed commercial roof inspections for insurance claim purposes, and have you met with commercial adjusters?
- What is your methodology for distinguishing storm-caused damage from pre-existing conditions?
- Can you provide references from commercial property managers or building owners for post-storm inspection work?